
Preparing Your Guitar for Staining: A Step-by-Step Guide
So, you've decided to take the bold step of staining your guitar. Bravo, my friend! You're about to embark on a journey that will give your beloved instrument a makeover like no other. But before you dive headfirst into a vat of wood stain, let's talk about how to prepare your guitar for this epic transformation. Think of it as a spa day for your six-stringed beauty. Start by giving your guitar a gentle exfoliation with a fine sandpaper, removing all the grime and imperfections accumulated over years of shredding. Then, find a cozy spot where your guitar can meditate peacefully, away from prying eyes and curious pets. It's time for a little bonding session with some wood conditioner. Massage it gently into the surface, soothing your instrument like a professional masseuse. Once your guitar is relaxed and moisturized, it's time to unleash the stain! But that's a tale for another day, my friends. Stay tuned for the next installment of 'Stain That Axe: A Saga of Musical Makeovers.' P.S. Don't forget to wear protective goggles, unless you fancy becoming a rockstar pirate with one eye covered. Arr!
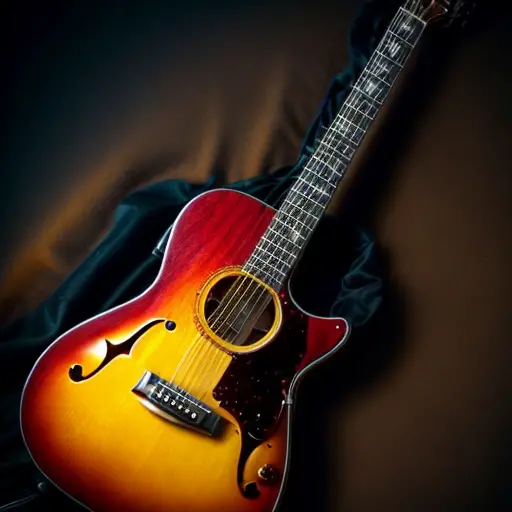
Choosing the Right Stain: Exploring Different Options and Techniques
An interesting fact about how to stain a guitar is that the process of staining involves the use of different types of wood stains, but it can also include unconventional materials such as tea, coffee, and even wine. These natural substances can be used to enhance the color and give the guitar a unique and vintage look, adding an interesting twist to the traditional staining techniques.
If you're a musician, staining your guitar is a great way to add a touch of personality to your beloved instrument. But before you embark on this creative journey, choosing the right stain becomes crucial. It's like picking the perfect outfit for your guitar! You want a stain that not only enhances its natural beauty but also matches your style preferences. Should you go for a classic wood stain or perhaps a bold neon green for that extra rock 'n' roll vibes? Maybe even consider a tie-dye effect for the ultimate retro look! Whatever stain you gravitate towards, it's essential to explore different options and techniques to ensure your guitar becomes a true standout amidst the sea of generic instruments. Remember, your guitar should reflect your personality, so don't be afraid to make a bold choice! Find the stain that speaks to you, and let your guitar roar with pride on stage.
Applying Stain to Your Guitar: Tips and Tricks for a Professional Finish
So, you've decided to take your musical journey to the next level and give your beloved guitar a fresh, new look. Well, fear not my fellow music enthusiasts, because today I'm here to impart some wisdom on the art of applying stain to your guitar. It's not just about slapping on some color and calling it a day, no sir! We're aiming for a professional finish, one that will make all those guitar virtuosos turn green with envy.
First things first, let's talk about preparation. Like any good musician, your guitar needs to warm up before the show. Start by removing all the hardware and giving your instrument a good sanding. Smooth out those imperfections as if you were caressing the strings of your guitar. Next, make sure you've got a clean surface by wiping it down with a damp cloth. Your guitar should feel fresh and ready for its makeover.
Now comes the fun part—choosing the right stain. Think of it as the wardrobe for your guitar. Are you going for a classic look with a warm, vintage vibe? Or maybe you're feeling adventurous and want to give your axe a vibrant burst of color? Whatever your choice, just make sure it suits your personal style and musical aspirations. Remember, you want your guitar to stand out on stage, not blend into the background like a wallflower.
Now that you've picked your stain, it's time to get down and dirty. Grab yourself a good quality brush and start applying that stain like a maestro conducting a symphony. Take your time, paint with confidence, and let the wood absorb the color like a thirsty crowd at a rock concert. Don't be afraid to layer it on, but keep in mind that less is sometimes more. Just like a perfectly executed guitar solo, it's all about finding the right balance.
When it comes to drying time, patience is key, my friend. Don't rush this process, or you'll risk ruining all your hard work. Your guitar needs time to soak in the stain and let its true colors shine. Set up a cozy corner for it to rest, away from any potential hazards that could smudge or dent your fresh coat of stain. Treat it like a rockstar diva and let it bask in the glorious ambiance of your admiration.
Once your guitar has had its beauty sleep and is thoroughly dry, it's time to bring it back to life. Reattach all the hardware and strings, tuned to perfection. As you strum those first chords, you'll feel an instant connection with your instrument's rejuvenated appearance. Your guitar will thank you, as will your audience, for the effort you've put into its makeover. And hey, if all else fails and you find yourself fretting over the stain job, just remember that even the greatest guitarists have had mishaps on stage. It's part of the journey, and in the end, it's all about the music, baby!
Finishing Touches: Sealing and Protecting Your Stained Guitar for Longevity
Fun fact: Did you know that staining a guitar not only adds a beautiful aesthetic touch, but it can also enhance the tonal qualities of the instrument? By carefully choosing the right stain color and method, you can achieve a unique and customized look while improving the resonance and sound projection of your guitar!
So, you've finally decided to give your guitar an edgy, new look with a stain. Congratulations! Now, before you go all Picasso on that beautiful instrument, let's talk about the finishing touches that will seal and protect your masterpiece for the long run. Think of it as giving your guitar a stylish raincoat that shields it from the elements. Start by sanding the wood like you're trying to break up with it gently, but firmly. Then, apply a pre-stain conditioner because even guitars need a little detangling before they dye. Now comes the fun part - staining! Be sure to apply smooth, even strokes with the grace of a ballerina wielding a brush. Once your guitar is dry and looking dapper, it's time for sealing. Think of it as giving your guitar a glossy tuxedo to make it truly stand out. So, polish that beauty up with a few coats of varnish, let it dry like a seasoned professional, and there you have it - a stunning stained guitar that's ready to rock harder than a Spinal Tap amplifier! Just remember, if all else fails, a beetroot stain also makes for a pretty killer air guitar. Rock on!